Showing posts with label tools. Show all posts

Monday, June 9, 2014

Dream Team: Tool Edition

Everyone has their wish list right? That list of tools that you're dying to save up enough for, but pesky stuff always gets in the way, like food and rent?
Well, here's mine.
Tools I Can Use Right Now

 
While I don't have the thicker gauges of metal, I have started experimenting with chasing and repousse. While technically this is a dapping set, meant for doming different shapes, I have also seen others use dapping tools for repousse. I'd be happy doing both. :) (not to mention you can also use it for polymer clay work.)

I admit, this one I'm sort of drooling over. A stepped bracelet mandrel, plus a tang for keeping it steady. =makes grabby hands= I've started drawing more bracelet designs, in wire, but I can't make them yet, because they need forming and a hard surface to hammer them on. :( This would solve that problem :D That, and for making polymer clay bracelets as well. ^^

 
While this set isn't my ideal set (since it jumps from 220 to 1,500 grit with nothing in between) it is still definitely on my list, because sandpaper is important.

 
Hammers! :D A jeweler’s best friends are her hammers. I love this set, because it has one that I do have (the chasing hammer, but you can never have to many of those) and all the others I don't. ^^

 
While this one does say it's for wax carving, I'd be re-purposing these towards polymer clay and metal clay carving.

 
When working with wire, the smoother your cut, the better. Hence why I want a pair of super flush cutters. I have two pairs and both are wearing out thanks to all the use they get, these would fix that.

 
Is there any reason why someone would /not/ want a third hand? I honestly can't think of any. And on a heavy base. <3

 
=sighs dreamily= This would be heaven to own. Not to mention making it so much easier to do  mokume gane work, and other delicate polymer clay designs.
Tools I Need More Supplies For

 
Having a disc cutter means (in the short run) cleaner and more precise discs. It can also mean templates for polymer clay, metal clay, and making crescents of various sizes. I'm sure there's more that I'm missing, but I'm short on sleep right now, XD.

 
Do I really need to explain this one? While I don't have the set up atm to start doing bezel setting, there are a few pieces that are building up in my head that I want to try it with.
* disclaimer I'm linking back to the different sites because they happen to have the tool I was looking for, with an image I can copy, not because I'm getting paid by them. Sadly.
 
So ladies and gents, what are some tools you’re drooling to get your hands on?
List’em in the comments below.




Wednesday, March 12, 2014

Alcohol Ink & Polymer Clay- A Guide-


Alcohol Ink Guide

As I mentioned last week, when I was recounting the perils of polymer clay, I originally started looking at polymer clay specifically for working with alcohol inks. I was first astounded by the lovely Veronika Sturdy over on Flickr with her work. It’s detailed and colorful and leaves me wanting to make LOTS of stuff!

And so I went hunting, to see if I could find out a) How to make my own alcohol ink and b) how to make something so vibrant and beautiful.

The first part was easy enough to find, over at Crafting a Green World, I read the tut, and quickly ran around my home looking for a bag of markers I’d stashed. Et voila! 30 mins later, I had a bunch of alcohol inks. But…. How do you use them?

Well, I found two lovely tutorials.

The first lets you make something like this

Except… you have to have liquid polymer clay. Which I don’t have access to for the time being… Hrm. Back to the internet. Which led to the second one.

A very lovely tut, easy simple to follow, and best of all, only two things were required, and I had both! Polymer clay and alcohol ink. Open-mouthed smile 

But… It’s not quite as vibrant as the lovely ones that Veronika Sturdy attains…
So I decided to  do tests first.  I had to make sure that it would work.  And that is what this post comes from. My tests of alcohol ink vs polymer clay.

First up, we have Alcohol Ink, painted directly to UNCURED clay.

SAM_0529SAM_0531

I used the same technique for both the white and the black pieces. Just a simple stripe of the different colors, going around the piece. I tried to make sure they didn’t bleed, but wasn’t 100% successful.

SAM_0532ISAM_0533

The row below is the pieces after they were baked. The colors of the inks became a little bit lighter, but not by much. The black has an iridescent look to it, which is hard to see unless you get the angle just right, and even harder to capture on camera.

SAM_0534SAM_0535

These next three photos are tests of CURED clay that was then painted. (The black ink didn’t change a bit, and I decided not to waste your time trying to see what wasn’t there. =sighs= I was so hoping for a beautiful black shimmer bangle…)

SAM_0536SAM_0537SAM_0538

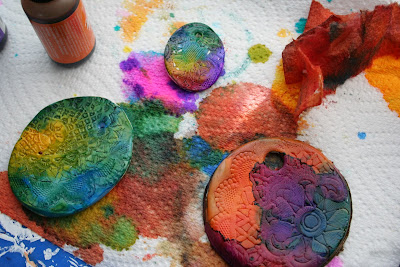
The first two are the same side, just with a wait time in between them. You can see how much more vibrant the colors are when done this way, but also how much more they bleed into one another through the groves O.O  The back is just a fun piece I did, testing out the splatter technique I see everyone doing on glass. Surprisingly it does work, but the colors are rather muddy.

SAM_0539SAM_0540

These last two photos are, believe it or not, taken just two hours after the first three. What happened? I was rubbing the pieces back and forth in my hands. Apparently without some sort of sealant the colors will rub away except in the deepest spots. Such as the groves of the piece on the left. However, I do like how the edges (?) are shown with the wearing away  on the right.


So, that is my tests on alcohol inks, and how they work when applied to polymer clay. I’ll be back with more soon enough. ^^

Ideas? Comments? Questions? Comment below Open-mouthed smile